Model-specific parts guide · content revised October 7, 2026
GE FUF14DLRWW troubleshooting
Temperature alarm/control, loading, vent, gasket, frost, and accessible drain checks using GE model support.
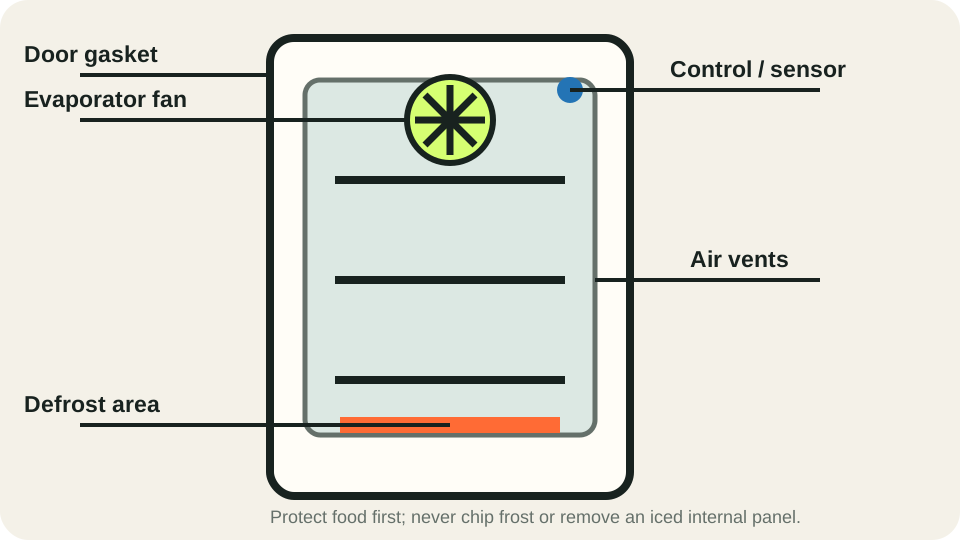
This page applies only when the complete rating-plate model matches FUF14DLRWW. A symptom does not prove that a part has failed. Use the regional manual and recall instructions when they differ.
Alarm and food record · GE FUF14DLRWW
Freezer warming or alarm: record the evidence first
Write down what happened before changing a setting. A single current thermometer reading cannot tell you how long food was warm.
When was the alarm first noticed? What does an independent freezer thermometer read now, and again after the door stays closed? Record the unit, °F or °C.
Was the door ajar? Does a paper strip grip evenly around the gasket? Note frost location and whether packages block the door or interior airflow.
For each food type, note ice crystals, package temperature if measured, and any known time at or above 40°F (4°C). Keep uncertain items separate while consulting the official chart.
Save the full model and serial number, alarm text, dated readings, door/frost observations, recent power interruption, and any change after an owner check.
What to do with the record
- Food: Check each food type against the official safety chart. If the time above 40°F is known, use that and the food type; if it is unknown, a new cold reading does not settle the earlier exposure.
- Freezer recovered: If the door or loading issue is corrected, the independent reading returns to the manual's normal range and the alarm stays clear, keep dated readings and watch for renewed frost or warming. Do not buy a part on the basis of one alarm.
- Still warming or alarm returns: Move food to a safely cold location, stop at the accessible checks and arrange GE service with the readings, alarm wording and frost/door observations. Internal fan, heater, controls and sealed-system diagnosis are service work.
Check result and next step
Separate a recovered freezer from uncertain food history
The dated alarm and food record above answers two separate questions: whether cooling recovered and whether each food is safe.
| Observation | What it establishes | Next action |
|---|---|---|
| Door correction clears the alarm and temperature recovers | Cooling recovered under the corrected condition. | Keep follow-up readings; evaluate food from its own temperature and exposure history. |
| Alarm returns or an independent reading remains warm | Recovery was incomplete or temporary. | Protect food and contact GE with the alarm wording and dated readings. |
| Current temperature is cold, but the warm interval is unknown | The new reading cannot reconstruct earlier exposure. | Use the official food-specific safety guidance; do not taste food to test safety. |
Check a used FUF14DLRWW before accepting it
Check gasket contact, shelves and a stable freezer reading; protect food before any prolonged test.
Parts boundary: An unknown warm interval cannot be converted into a food-safe duration.
Quick start
What exactly is happening?
Choose the symptom closest to what you observe. We will show the matching diagnostic route first.
Model-specific parts guidance
Replaceable parts and how to confirm them
Upright-freezer diagnosis centered on measured temperature, alarm state, door seal, airflow and frost pattern. Protect food first; sealed-system work is excluded.
Door gasket
moderate part-cost tierOEM identification: Confirm in the official parts diagram with the complete rating-plate suffix; do not order by the base model alone.
Location: Around the upright freezer door perimeter.
Suspect it when
- Frost concentrates near an edge
- Paper-strip contact is weak
- The gasket is torn or permanently deformed
Confirm before ordering
- Clean both contact surfaces
- Check loading and cabinet level
- Test contact around the full perimeter
Repair route: Correct obstruction and clean the seal; replace only after hinge and suffix checks.
Boundary: Do not heat, stretch or glue the gasket.
Verify afterward
- Repeat the paper test
- Confirm the alarm stays clear
- Watch for frost return over several days
Evaporator fan
moderate part-cost tierOEM identification: Confirm in the official parts diagram with the complete rating-plate suffix; do not order by the base model alone.
Location: Behind the internal rear evaporator cover.
Suspect it when
- Compressor runs but internal airflow is absent
- Temperature varies greatly by shelf
- A fan strikes ice or makes repeated noise
Confirm before ordering
- Clear visible vents and loading
- Record the frost pattern
- Have fan supply and free movement tested after safe defrost
Repair route: Replace only a tested motor and correct any defrost cause that stopped it.
Boundary: Do not remove an iced panel or insert tools into vents.
Verify afterward
- Confirm airflow at multiple shelves
- Measure temperature after recovery
- Check noise and frost do not return
Defrost heater / sensing circuit
moderate part-cost tierOEM identification: Confirm in the official parts diagram with the complete rating-plate suffix; do not order by the base model alone.
Location: At the evaporator behind the internal rear cover.
Suspect it when
- A solid frost blanket blocks airflow
- Cooling returns after a complete safe defrost then declines
Confirm before ordering
- Photograph the frost pattern
- Rule out a door-seal air leak
- Have heater, sensor and control tested as a system
Repair route: Replace the failed tested component rather than guessing from frost alone.
Boundary: Internal panels, heaters and wiring are service work; use no sharp tool or heat gun.
Verify afterward
- Confirm stable airflow
- Measure temperature for several days
- Check for rapid frost recurrence
Temperature control / thermistor
moderate part-cost tierOEM identification: Confirm in the official parts diagram with the complete rating-plate suffix; do not order by the base model alone.
Location: At the control assembly and model-listed sensing location.
Suspect it when
- Alarm persists despite measured stable conditions
- Compressor cycling does not match cabinet temperature
Confirm before ordering
- Use a separate freezer thermometer
- Allow the documented response time
- Have sensor values and control output checked
Repair route: Replace only after the sensor and control have been distinguished by testing.
Boundary: Do not bypass the alarm, sensor or compressor protection.
Verify afterward
- Confirm measured temperature
- Verify normal cycling
- Test alarm response as the manual permits
DIY, service, or replace?
Reasonable DIY
Food protection, thermometer checks, loading, vent clearance, gasket cleaning and safe manual defrost are owner work.
Arrange service
Use service for fan, defrost, sensor, control, compressor or sealed-system faults.
Consider replacement
Replacement is reasonable after a confirmed sealed-system repair or combined control/defrost/fan faults when age and food-loss risk outweigh the repair.
Model-specific evidence
- FUF14DLRWW model literature
Exact suffix owner and installation documentation.
- FUF14DLRWW official parts diagrams
Exploded assembly and compatible part confirmation.
Tools for the supported checks
- Freezer thermometer
- Paper strip
- Towels
- Coolers for food
Confirm before acting
- Record the full model suffix
- Protect food and measure temperature
- Check control/alarm status
- Inspect visible vents, gasket contact, and frost pattern
Supported owner actions
- Correct loading or control setting
- Clean the gasket contact surface
- Use only the documented defrost and drain procedure
- Food safety cannot be maintained
- Water reaches wiring
- The compressor repeatedly clicks or an electrical odor appears
Verify after the check or repair
- Allow the manual-stated recovery period
- Confirm stable temperature
- Check that frost, alarm, or leakage does not return