Model-specific parts guide · content revised October 7, 2026
GE GSS25GYPFS troubleshooting
Temperature, TurboCool/control, door seal, airflow, filter, and ice-maker setup checks using GE model support.
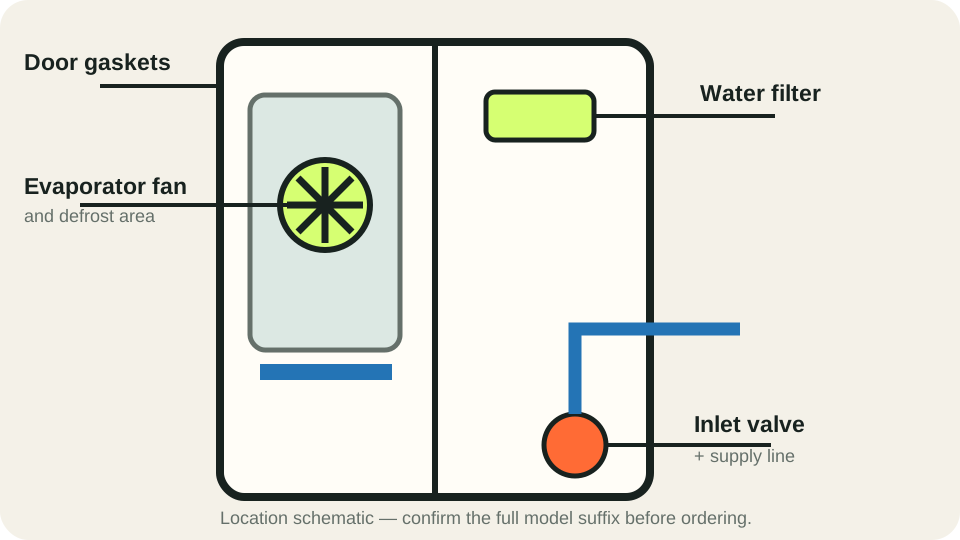
This page applies only when the complete rating-plate model matches GSS25GYPFS. A symptom does not prove that a part has failed. Use the regional manual and recall instructions when they differ.
Two-compartment decision map · GE GSS25GYPFS
Refrigerator warm? Measure both compartments first
This side-by-side has separate fresh-food and freezer compartments. Record independent thermometer readings, the time, and the display setting. GE's general guidance begins with door closure, loading and blocked airflow. One warm reading after an open door does not identify a fan, sensor or sealed-system failure.
Both compartments warm
Check the controls, both doors and recent power interruption. Protect the food. If both measured temperatures remain high after the manual's stabilization period, arrange GE service; do not pick a compressor or control from this pattern alone.
Freezer cold, fresh-food side warm
Move tall containers away from the fresh-food air path and check that the door closes and gasket contacts evenly. Retake dated readings with the doors closed. If fresh food remains above 40°F while the freezer stays cold, give GE the two readings and any frost or airflow observation for service diagnosis.
One area warm or repeated door openings
Note the thermometer position, crowded shelves, large items at the back and whether the door was left ajar. Recheck after restoring clearance and normal use. If the same area stays warm, contact GE rather than adding a part based on a single shelf reading.
Recently installed or setting changed
GE says a newly installed refrigerator may need about 24 hours to stabilize. Record readings while keeping doors closed. This waiting period does not extend food-safe time: store perishables elsewhere if their temperature is unsafe.
Resolved when: Both compartments return to the manual's normal range, remain there on follow-up readings, and no new frost or door problem appears. Service when: Either compartment stays warm after the supported checks, frost spreads, or the door cannot seal. Bring the copied note and full model suffix; internal electrical and refrigerant work remains with service.
Check result and next step
Turn the paired temperature record into a service question
Read the refrigerator and freezer thermometers as a pair. The comparison above preserves which compartment changed and when, without assigning a fan or compressor fault.
| Observation | What it establishes | Next action |
|---|---|---|
| Freezer stays cold; fresh-food reading remains warm | The complaint is compartment-specific. | Record blocked vents, loading and door history for GE. |
| Both readings remain warm | Food protection takes priority over identifying a part. | Move perishables to safe storage and request service with both readings. |
| Readings recover after a door or loading correction | Recovery supports observing the corrected condition. | Keep follow-up readings; a new cold reading cannot establish earlier food safety. |
Check a used GSS25GYPFS before accepting it
Measure both compartments and inspect door seals and shelf airflow before evaluating a used unit.
Parts boundary: A single warm reading cannot establish a fan, sensor or sealed-system failure.
Quick start
What exactly is happening?
Choose the symptom closest to what you observe. We will show the matching diagnostic route first.
Model-specific parts guidance
Replaceable parts and how to confirm them
Side-by-side refrigerator diagnosis centered on measured temperature, airflow, frost pattern, door sealing and the external water path. Sealed-system work is not a homeowner repair.
Door gasket
moderate part-cost tierOEM identification: Confirm in the official parts diagram with the complete rating-plate suffix; do not order by the base model alone.
Location: Around the fresh-food or freezer door perimeter.
Suspect it when
- Condensation or frost is concentrated near one edge
- Paper-strip contact is weak
- A visible tear or hardened section is present
Confirm before ordering
- Clean the gasket and cabinet contact surface
- Check for food or bin interference
- Compare contact around all four sides
Repair route: Correct loading and clean the seal; replace only after hinge alignment and full suffix are checked.
Boundary: Do not heat, stretch or glue the gasket. Door alignment may require two people.
Verify afterward
- Repeat the paper-strip test
- Check for condensation after 24 hours
- Confirm the door self-closes as designed
Evaporator fan system
moderate part-cost tierOEM identification: Confirm in the official parts diagram with the complete rating-plate suffix; do not order by the base model alone.
Location: Behind the freezer’s internal rear cover, downstream of the evaporator.
Suspect it when
- Freezer is cold but fresh-food side is warm
- No airflow is felt at visible vents
- Noise changes when the freezer door opens
Confirm before ordering
- Check vents and loading first
- Record the frost pattern without removing an iced panel
- A technician should confirm fan voltage and free movement
Repair route: Arrange diagnosis before ordering the motor; frost can stop a good fan.
Boundary: Internal cover removal exposes wiring and sharp metal; never chip ice from the panel.
Verify afterward
- Confirm airflow at both compartments
- Measure temperature after stabilization
- Check that noise does not return
Defrost system
moderate part-cost tierOEM identification: Confirm in the official parts diagram with the complete rating-plate suffix; do not order by the base model alone.
Location: At the freezer evaporator behind the internal rear cover.
Suspect it when
- A solid frost blanket blocks airflow
- Cooling returns temporarily after a full safe defrost
Confirm before ordering
- Photograph the frost pattern
- Rule out a door-seal air leak
- Have heater, termination sensor and control tested as a circuit
Repair route: Replace only the component that fails testing, not the entire group by guess.
Boundary: Heater and live measurements are service work; use no knife or heat gun.
Verify afterward
- Allow a complete cooling cycle
- Confirm airflow remains present
- Recheck for rapid frost return over several days
Water inlet valve / supply path
moderate part-cost tierOEM identification: Confirm in the official parts diagram with the complete rating-plate suffix; do not order by the base model alone.
Location: At the rear lower cabinet where the household line enters.
Suspect it when
- No water or ice with a known-good filter
- Valve chatters or leaks
- Water appears behind the refrigerator
Confirm before ordering
- Close the household valve if leaking
- Confirm supply flow and filter seating
- A technician should separate valve, ice maker and control causes
Repair route: Repair the external connection or replace a tested valve using the exact diagram.
Boundary: Pulling a refrigerator can strain the line; never work where water reaches an outlet.
Verify afterward
- Restore pressure with power off
- Dry and inspect every joint
- Test dispenser and ice fill while observing
DIY, service, or replace?
Reasonable DIY
Temperature measurement, loading, vent clearance, gasket cleaning, filter seating and accessible supply checks are owner work.
Arrange service
Use service for fan, defrost, valve, ice-maker, control or sealed-system diagnosis.
Consider replacement
Replacement becomes reasonable when a sealed-system repair is combined with door damage, liner damage or multiple aging electrical assemblies.
Model-specific evidence
- GSS25GYPFS model literature
Exact suffix manual and installation-document lookup.
- GSS25GYPFS official parts diagrams
Exploded assemblies and suffix-compatible part confirmation.
Tools for the supported checks
- Appliance thermometer
- Flashlight
- Paper strip
- Towels
Confirm before acting
- Confirm the full suffix after GSS25GYPFS
- Measure both compartment temperatures
- Inspect visible vents, gasket contact, supply line, and filter seating
Supported owner actions
- Correct loading that blocks airflow
- Clean the gasket contact surface
- Use only the exact-model filter or specified bypass
- Food is above a safe temperature
- An active supply-line leak is present
- There is smoke, sparking, or repeated clicking
Verify after the check or repair
- Allow the documented stabilization period
- Check temperatures with a separate thermometer
- Test water and ice operation while watching for leaks