Model-specific parts guide · content revised October 7, 2026
GE JB645RKSS troubleshooting
Control lock, delay, clock, rack/foil airflow, door closure, and documented temperature adjustment.
This page applies only when the complete rating-plate model matches JB645RKSS. A symptom does not prove that a part has failed. Use the regional manual and recall instructions when they differ.
Repeatable bake comparison · GE JB645RKSS
Oven seems too hot or cold? Compare a repeatable bake
An oven cycles above and below its setting. One thermometer reading, especially after opening the door, is not a reliable calibration decision. GE recommends a packaged biscuit bake test for cooking performance. Follow the package and the rack position in your exact owner manual; this record helps you keep the conditions and result together.
- Use the same packaged biscuits and a shiny, low-sided baking sheet. Keep the oven floor and rack free of foil; leave clearance around the sheet.
- Select the package's bake temperature, allow the preheat indicator to finish, and note the rack position. Do not open the door before the package's minimum time.
- Record the result at the minimum and maximum package time. If the result is uneven, note the side or rack area before drawing a conclusion.
If the batch bakes as directed, do not adjust calibration on the strength of a single thermometer swing. Review pan, rack and recipe differences for a particular dish.
Repeat under comparable conditions, then use only the adjustment procedure in the JB645RKSS manual or contact GE. A setting change cannot repair a damaged element or door seal.
Stop if an element is visibly damaged, the door will not close, wiring smells hot, or an error persists. Let the range cool and do not remove panels or test live electrical parts.
End point: A normal bake within the package time closes this particular performance check. If comparable batches repeatedly fail after pan, rack and preheat are corrected, take the copied note to the JB645RKSS manual or GE service. Calibration is a preference adjustment for a stable offset, not a repair for visible damage or an electrical fault.
Check result and next step
Use the repeatable bake record before changing an offset
GE recommends a packaged biscuit comparison for cooking performance. Keep recipe and pan conditions constant before deciding whether a temperature adjustment is relevant.
| Observation | What it establishes | Next action |
|---|---|---|
| Comparable batch bakes within package directions | That result does not support an offset change. | Review conditions for the particular dish that caused the complaint. |
| Repeated comparable batches finish too early or late | A repeatable cooking complaint is recorded. | Consult this model's control instructions or send the bake record to GE. |
| Element damage, electrical odor or repeated breaker trip | This is outside the bake-comparison route. | Stop operation and arrange qualified service. |
Check a used JB645RKSS before accepting it
Check element condition without energizing a damaged element, door seal and cooktop surface.
Parts boundary: Do not diagnose an element from a single baked item or bypass a tripping breaker.
Quick start
What exactly is happening?
Choose the symptom closest to what you observe. We will show the matching diagnostic route first.
Model-specific parts guidance
Replaceable parts and how to confirm them
Exact-model electric-range diagnosis for controls, dual bake elements, surface elements, door and temperature behavior. All internal work is 240-volt service work.
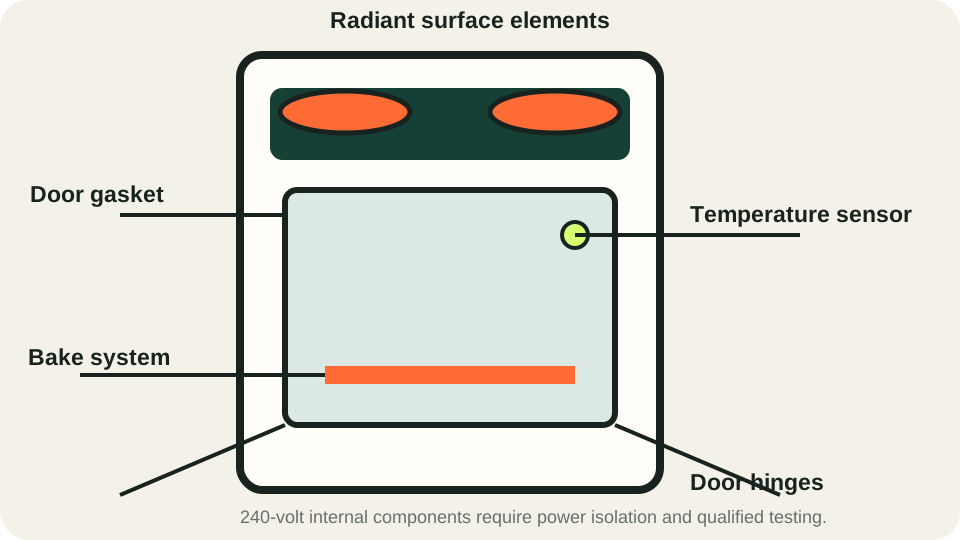
Bake element system
moderate part-cost tierOEM identification: Confirm in the official parts diagram with the complete rating-plate suffix; do not order by the base model alone.
Location: At the lower oven cavity; this model uses a dual-element bake design.
Suspect it when
- Broil works but bake preheat fails
- Visible element damage or localized blistering appears
- Heating is consistently incomplete
Confirm before ordering
- Inspect only when fully cool and power is isolated
- Confirm mode and control settings
- Have element resistance, wiring and relay output tested
Repair route: Replace only the failed suffix-matched element or control component.
Boundary: Do not energize an exposed element or perform live voltage checks.
Verify afterward
- Run a supervised preheat
- Check for even cycling
- Confirm normal shutoff and no odor
Oven temperature sensor
moderate part-cost tierOEM identification: Confirm in the official parts diagram with the complete rating-plate suffix; do not order by the base model alone.
Location: Inside the oven cavity, connected through the rear insulation area.
Suspect it when
- Temperature error is repeatable across several cycles
- Preheat overshoots or undershoots after rack/foil issues are corrected
Confirm before ordering
- Use an oven-rated center-rack thermometer
- Average more than one cycle
- Have sensor resistance checked before calibration or replacement
Repair route: Use documented calibration only for a stable offset; replace a tested bad sensor.
Boundary: Rear access and wiring are service work; insulation and sharp panels are present.
Verify afterward
- Repeat the multi-cycle temperature test
- Confirm stable preheat
- Check that no fault returns
Surface radiant element / limiter
moderate part-cost tierOEM identification: Confirm in the official parts diagram with the complete rating-plate suffix; do not order by the base model alone.
Location: Beneath the ceramic cooktop at the affected burner.
Suspect it when
- One burner does not heat
- Only one ring of a dual element operates
- Heat is visibly uneven
Confirm before ordering
- Confirm the correct control position
- Inspect the glass for damage
- Have element, limiter, switch and wiring tested separately
Repair route: Replace the confirmed failed component using the exact diagram.
Boundary: Cooktop lifting and all 240-volt testing are qualified-service tasks.
Verify afterward
- Test each ring under supervision
- Confirm the control cycles normally
- Stop for hot-terminal odor or arcing
Door gasket / hinge system
moderate part-cost tierOEM identification: Confirm in the official parts diagram with the complete rating-plate suffix; do not order by the base model alone.
Location: Around the oven opening and at both lower door hinges.
Suspect it when
- Heat escapes at one edge
- Door will not close evenly
- Gasket is torn or hinge movement is uneven
Confirm before ordering
- Inspect only when fully cool
- Rule out rack and pan obstruction
- Compare gap and gasket contact around the perimeter
Repair route: Replace a torn gasket or confirmed hinge pair with matched parts.
Boundary: The door is heavy; use two-person handling and do not operate with cracked glass.
Verify afterward
- Confirm even closure
- Run a supervised preheat
- Check the exterior for abnormal hot spots
DIY, service, or replace?
Reasonable DIY
Control-mode correction, rack/foil placement, cool visual inspection and multi-cycle temperature measurement are owner work.
Arrange service
Use service for elements, sensors, switches, relays, wiring, cooktop lifting or breaker-related faults.
Consider replacement
Consider replacement when cooktop glass damage combines with control or multiple element failures, or when wiring/terminal heat damage is extensive.
Model-specific evidence
- JB645RKSS product page
Exact model design and published feature confirmation.
- JB645RKSS official literature
Owner, installation and safety document lookup by full suffix.
- JB645RKSS official parts diagrams
Assembly location and suffix-compatible component lookup.
Tools for the supported checks
- Oven thermometer
- Flashlight
- Heat-resistant gloves
Confirm before acting
- Confirm the complete model suffix
- Check the control display for lock or delay
- Inspect the cool oven for airflow obstruction
- Measure with an oven-rated center-rack thermometer
Supported owner actions
- Cancel an unintended control mode
- Correct rack, pan, or foil placement
- Use only the documented temperature adjustment
- An element is damaged or sparks
- The breaker trips repeatedly
- There is a hot electrical odor or cracked glass
Verify after the check or repair
- Run a supervised preheat
- Verify temperature over more than one cycle
- Confirm normal shutoff