Model-specific parts guide · content revised October 7, 2026
Bosch SHE53B75UC troubleshooting
E-number-gated filter, pump-cover, spray-arm, drain-hose, and reset checks. The full /xx E-number controls parts.
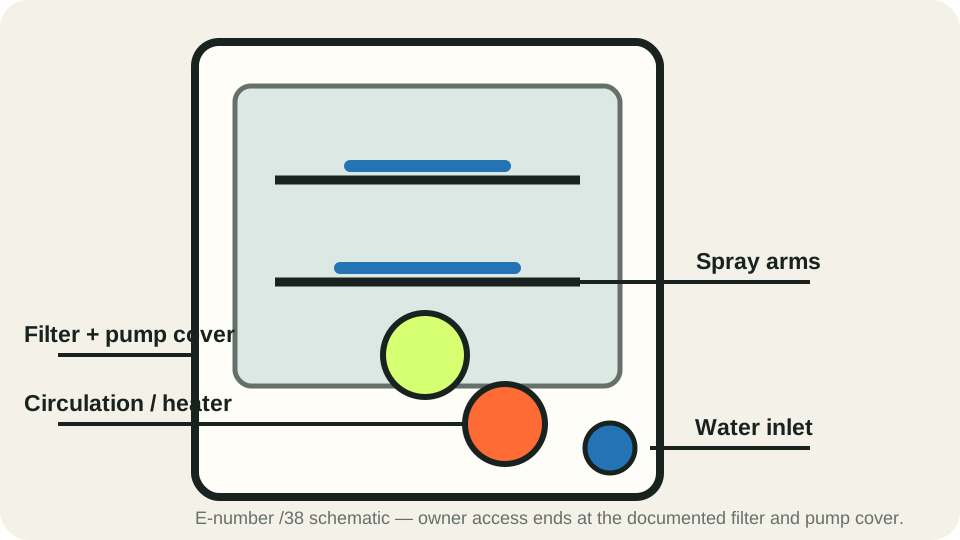
This page applies only when the complete rating-plate model matches SHE53B75UC. A symptom does not prove that a part has failed. Use the regional manual and recall instructions when they differ.
Drain-path map · Bosch SHE53B75UC/38
Water will not drain: follow the path
Scope: This path was checked against the SHE53B75UC/38 manual. Confirm the complete /xx E-Nr on your rating plate; another revision may differ.
Record the exact displayed code first. Bosch's model manual lists E:61-02 for a loose pump cover or obstruction and E:61-03 for a drain-path problem. Bosch's general E:24/E:25 help covers related symptoms; the displayed code on this exact unit takes priority.
- Tub and filterVisible debris or standing water? Clean and reseat the filter as the model manual describes.
- Pump coverIf still blocked, disconnect power, remove standing water, and inspect the cover and impeller area by the manual. Sharp fragments may be present; the cover must click back in.
- Drain hose and high loopCheck only accessible hose sections for a kink and note whether the required high loop is present. Do not pull out an installed unit to reach concealed plumbing.
- Sink connectionIf the problem began after disposer installation, check whether its dishwasher inlet plug was removed. Note any air-gap or sink backup; have inaccessible plumbing checked professionally.
Check the result after reassembly
After the cover clicks in and the filter is locked, run the manual's normal drain or a supervised short cycle. Resolved: water drains, no code returns and no water leaks. Still blocked: record the exact code, when it appears and whether water remains; contact Bosch service with the full E-Nr. If the sink backs up or the disposer connection is inaccessible, use a plumber or installer for that branch. Do not keep running a leaking appliance.
Check result and next step
Use the full E-number and exact E:61 suffix
The /38 manual distinguishes E:61-02 and E:61-03. Retain the complete code; a broad E:24 article should not replace the exact manual for your revision.
| Observation | What it establishes | Next action |
|---|---|---|
| E:61-02 and the pump cover will not lock | The documented cover/obstruction check is unresolved. | Do not force it or run with the cover loose; follow the /xx manual or arrange service. |
| E:61-03 began after sink or disposer work | The installation history points to the household drain connection. | Have the accessible connection checked; use an installer for concealed plumbing. |
| Drain works after reassembly, with no leak or code | The supported drain check succeeded. | Monitor recurrence; send the E-Nr and exact code if it returns. |
Check a used SHE53B75UC before accepting it
Inspect racks, filter lock, pump-cover fit and door-edge E-number; do not assume a /38 parts diagram fits another /xx.
Parts boundary: Internal pump or electrical work requires the exact E-number and qualified diagnosis.
Quick start
What exactly is happening?
Choose the symptom closest to what you observe. We will show the matching diagnostic route first.
Model-specific parts guidance
Replaceable parts and how to confirm them
This guide is gated to E-number SHE53B75UC/38. Bosch lists about 150 parts across its official exploded diagrams; the complete /xx E-number must match before ordering.
Filter system
low part-cost tierOEM identification: Select from the official SHE53B75UC/38 diagram; filter pieces may be listed separately.
Location: At the bottom of the tub below the lower rack.
Suspect it when
- Food remains on dishes
- Drain performance falls
- Visible debris is trapped in the filter
Confirm before ordering
- Disconnect power
- Unlock and inspect every documented filter section
- Confirm the filter seats and locks without force
Repair route: Clean and lock the filter; replace cracked mesh or locking parts through the /38 diagram.
Boundary: Wear gloves because glass may be hidden. Never run with the filter loose.
Verify afterward
- Run a rinse cycle
- Confirm the filter remains locked
- Check the sump for abnormal debris
Drain-pump / pump-cover area
moderate part-cost tierOEM identification: Confirm in the official parts diagram with the complete rating-plate suffix; do not order by the base model alone.
Location: In the sump beneath the filter; owner access is limited to the manual-listed pump cover.
Suspect it when
- E:24 or E:25 continues after hose checks
- Standing water remains
- The pump makes an abnormal sound
Confirm before ordering
- Check the sink connection and hose first
- Remove only visible debris under the documented cover
- A technician should test the pump before replacement
Repair route: Owner action ends after safe debris removal and correct cover refitting.
Boundary: Do not reach into the sump with power connected or pull a hardwired unit from the cabinet.
Verify afterward
- Run a supervised drain
- Confirm the cover stays locked
- Inspect below and under the sink for leaks
Circulation / heat-pump assembly
high part-cost tierOEM identification: Confirm in the official parts diagram with the complete rating-plate suffix; do not order by the base model alone.
Location: Below the tub inside the base.
Suspect it when
- Water fills but spray is absent
- Cleaning and heating remain poor with clear arms and filters
Confirm before ordering
- Confirm spray-arm clearance and filter condition
- Listen for circulation after fill
- Use service diagnostics to separate pump, heater and control
Repair route: Qualified service should test the assembly before a /38-compatible order.
Boundary: This is internal wet electrical work and is not an owner-access repair.
Verify afterward
- Confirm normal spray sound
- Verify cleaning on a test load
- Check for base leakage and returning errors
Water-inlet / leak-protection system
moderate part-cost tierOEM identification: Confirm in the official parts diagram with the complete rating-plate suffix; do not order by the base model alone.
Location: At the supply connection and inside the machine base.
Suspect it when
- No fill with a good household supply
- Water is present below the unit
- Leak protection activates
Confirm before ordering
- Close the water valve if leakage is suspected
- Inspect only the accessible supply connection
- Arrange diagnosis of the valve, float and base tray
Repair route: Repair an external joint or have the exact failed internal component replaced.
Boundary: Do not reset and run a machine with water in the base or an RCD/breaker trip.
Verify afterward
- Pressure-test accessible joints
- Run a supervised fill
- Confirm no water accumulates below the machine
DIY, service, or replace?
Reasonable DIY
Filter cleaning, spray-arm clearance, loading and accessible sink-side drain checks are appropriate owner actions.
Arrange service
Use Bosch service for a pump, heat-pump, inlet, leak-protection, wiring or base-tray condition.
Consider replacement
Consider replacement after a confirmed high-cost heat-pump/control repair when there is also tub, rack-system or leak damage.
Model-specific evidence
- SHE53B75UC/38 appliance information
Exact E-number, manuals, service and support identity.
- SHE53B75UC/38 replacement-part overview
Official exploded diagrams and the model-specific parts list.
Tools for the supported checks
- Towels
- Protective gloves
- Flashlight
Confirm before acting
- Record the complete E-number, including /xx
- Disconnect power
- Inspect the filter system and pump-cover area only as the Bosch manual shows
Supported owner actions
- Clean and reinstall the filter system
- Remove only visible debris from the owner-accessible pump area
- Restore spray-arm clearance and perform the documented reset
- The E-number differs from the support page
- Glass or a sharp object cannot be safely removed
- Water is below the machine or reaches wiring
Verify after the check or repair
- Run a supervised rinse/drain
- Confirm the filter and pump cover are locked
- Check that the error does not recur