Exact-model advanced DIY · content revised October 7, 2026
Whirlpool WED87HED troubleshooting
Airflow and start diagnosis plus a photographed, exact-platform drive-belt procedure.
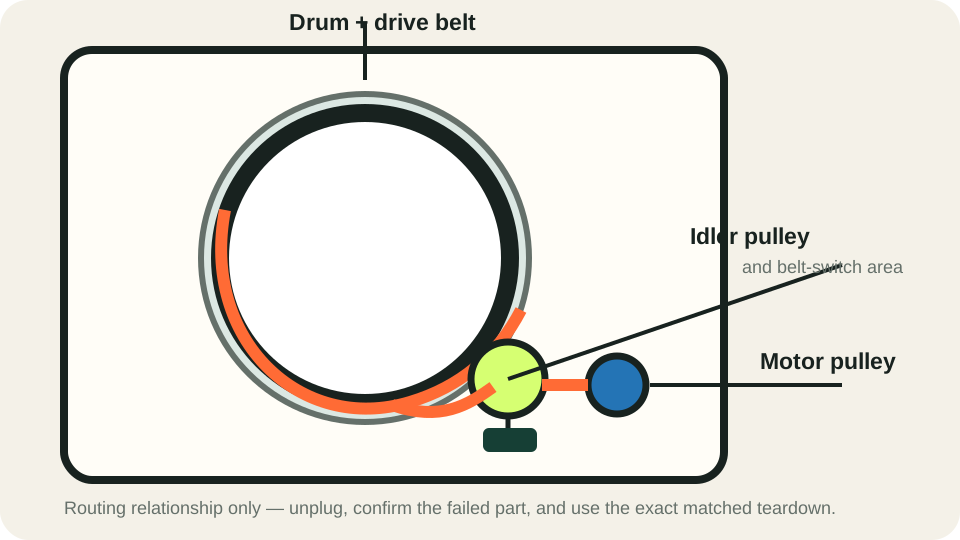
This page applies only when the complete rating-plate model matches WED87HED. A symptom does not prove that a part has failed. Use the regional manual and recall instructions when they differ.
Check result and next step
Decide whether the complaint is airflow or drum motion
The matched photographed belt guide addresses drum drive. It does not establish the cause of a no-heat complaint or authorize live 240-volt tests.
| Observation | What it establishes | Next action |
|---|---|---|
| Drum turns; drying is slow and outside airflow is weak | The external air path remains a first check. | Restore the accessible vent route before diagnosing a heater. |
| Motor runs but drum does not turn | A drive-path inspection may be relevant. | Match the complete suffix and photographed guide; use service if the layout differs. |
| Hot wiring odor, scraping or repeated protection trip | Another powered trial may worsen damage. | Stop and request diagnosis of the observed condition before selecting a belt or heater. |
Check a used WED87HED before accepting it
Check lint screen, accessible transition duct, drum movement and the complete suffix before accepting a used dryer.
Parts boundary: Do not run a unit with hot wiring odor or a restricted vent.
Keep a note for the service visit
Record control/door state, outside vent airflow, drum movement and any scraping or hot odor during a supervised test.
Quick start
What exactly is happening?
Choose the symptom closest to what you observe. We will show the matching diagnostic route first.
Model-specific parts guidance
Replaceable parts and how to confirm them
Exact-platform airflow and drive diagnosis for WED87HED. The belt route is documented for this platform, but every internal part still requires the full suffix and a physical diagnosis.
Drum drive belt
moderate part-cost tierOEM identification: Confirm in the official parts diagram with the complete rating-plate suffix; do not order by the base model alone.
Location: Wrapped around the drum, routed through the idler and motor pulley.
Suspect it when
- Motor runs but drum does not turn
- Belt is visibly broken or displaced
- Drum turns unusually freely by hand with power disconnected
Confirm before ordering
- Rule out an oversized load
- Disconnect power before any internal inspection
- Inspect idler and drum supports before ordering only a belt
Repair route: Use the exact-platform belt route and photograph wiring and panel positions during disassembly.
Boundary: This requires substantial cabinet disassembly; stop for heat-damaged terminals or a binding drum.
Verify afterward
- Turn the drum by hand before closing
- Reinstall every guard and panel
- Run a short empty test for tracking and noise
Idler pulley / tensioner
moderate part-cost tierOEM identification: Confirm in the official parts diagram with the complete rating-plate suffix; do not order by the base model alone.
Location: Below the drum beside the motor pulley.
Suspect it when
- Squeal or scraping follows drum speed
- Belt wear is uneven
- Pulley binds during belt inspection
Confirm before ordering
- Inspect only with power disconnected
- Check pulley rotation and belt alignment
- Inspect the belt and motor pulley together
Repair route: Replace a confirmed binding or damaged tensioner rather than fitting a new belt over it.
Boundary: Do not lubricate unless Whirlpool explicitly specifies it for the exact part.
Verify afterward
- Confirm smooth hand rotation
- Check belt alignment
- Run a supervised empty test
Thermal protection / heater circuit
moderate part-cost tierOEM identification: Confirm in the official parts diagram with the complete rating-plate suffix; do not order by the base model alone.
Location: Inside the heater and blower airflow path.
Suspect it when
- Dryer runs with no heat
- A thermal device tests open after airflow failure
- Breaker is stable but temperature remains abnormal
Confirm before ordering
- Restore the entire external vent first
- Confirm both legs of household supply through qualified testing
- Test heater and protection devices individually
Repair route: Replace only the failed tested component and correct the airflow cause.
Boundary: 240-volt live testing and open-cabinet operation are excluded.
Verify afterward
- Confirm strong outside airflow
- Run a timed dry test
- Stop for overheating or scorching odor
Belt switch / motor circuit
moderate part-cost tierOEM identification: Confirm in the official parts diagram with the complete rating-plate suffix; do not order by the base model alone.
Location: Near the idler and motor assembly.
Suspect it when
- The dryer will not run after a belt failure
- The belt is intact but start circuit remains open
Confirm before ordering
- Confirm door latch, controls and household supply
- Inspect the belt and idler first
- Have switch, motor and control circuit tested
Repair route: Replace only after the exact failed circuit is identified.
Boundary: Never bypass the door, belt or thermal safety switch.
Verify afterward
- Reassemble all guards
- Confirm reliable start and stop
- Listen for abnormal motor or blower noise
DIY, service, or replace?
Reasonable DIY
Lint screen, transition duct, outside vent, load and cycle checks are owner work.
Arrange service
Use service for 240-volt supply, heater, thermal device, motor, control or any heat-damaged connector.
Consider replacement
Consider replacement when motor/control or heater repairs combine with drum-support wear, cabinet damage or repeated overheating.
Model-specific evidence
- WED87HED manual lookup
Exact suffix owner and installation documents.
- WED87HED official parts lookup
Compatibility check before ordering any internal component.
- WED87HED drive-belt replacement
Exact-platform photographed belt access and routing reference; not a manufacturer service manual.
Tools for the supported checks
- Phillips screwdriver
- 1/4-inch nut driver
- Small flat screwdriver
- Phone camera
Confirm before acting
- Confirm the label reads WED87HED
- Rule out control, door, breaker, lint-screen, and external-vent causes
- Inspect the belt before ordering
Supported owner actions
- Clean the lint screen and restore the external vent
- Use the matched photographed belt route when the belt is confirmed broken or displaced
- Any wire or terminal is heat-damaged
- The drum, motor, or idler binds
- Live testing would require an open cabinet
Verify after the check or repair
- Reinstall every panel and guard
- Run a short supervised empty test
- Stop for scraping, odor, vibration, or poor airflow