Model-specific parts guide · content revised October 7, 2026
LG LW8017ERSM troubleshooting
Mode, set point, filter, visible coils, airflow, drain, and installation checks for the LG window unit.
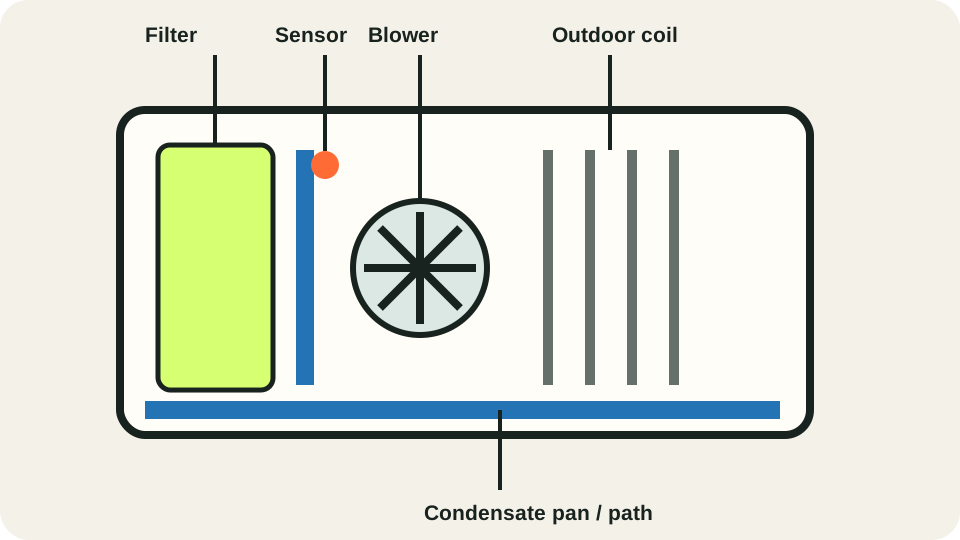
This page applies only when the complete rating-plate model matches LW8017ERSM. A symptom does not prove that a part has failed. Use the regional manual and recall instructions when they differ.
Leak-location decision map · LG LW8017ERSM
Where is the water, and when does it appear?
Before buying a drain part, record whether water is outdoors or indoors, whether the unit is cooling, and whether rain or visible ice came first. Match the complete model suffix to the LG manual. This map sorts observations; it does not certify an installation or identify a failed part.
Outside rear, while cooling
Check: Water at the outdoor side or in the base pan can accompany humid operation. Keep the outdoor discharge clear; do not drill the pan or remove a plug unless your exact manual instructs it.
End point: If cooling is normal and the indoor side stays dry, no leak repair is indicated by this observation alone. If water crosses indoors, use the next branch.
Inside front or sill, while cooling
Check: Switch off; note the first wet spot, filter condition and whether the rear slopes outward. Clean only the user-access filter as instructed. Have the installer verify secure mounting and the model's prescribed slope; do not shift a heavy window unit while installed.
End point: If the indoor side stays dry on a supervised cooling run, monitor it. If it wets again, stop using it and contact LG or the installer with photos of the first wet spot.
Ice first, then water after stopping
Check: Photograph visible ice, stop cooling and let it thaw without scraping. Check the accessible filter and airflow. LG notes blocked or slow airflow as a common frost cause.
End point: If ice or leakage returns after the filter is clean and airflow is open, arrange service. Do not infer a refrigerant shortage from water alone.
Rain only, even while off
Check: Note the first entry point around the sash, frame or unit. Rain-only water suggests an installation or weather-sealing path rather than cooling condensate; that is an inference from timing, not a confirmed cause.
End point: Keep the unit off if water reaches the plug or outlet and have the installer inspect the window seal and support. Do not seal an intended drain opening.
Check result and next step
Choose the branch from when and where water first appears
Use the leak-location map above for this LG window unit. GE ClearView level and pumped-drain instructions belong to a different design.
| Observation | What it establishes | Next action |
|---|---|---|
| Water enters only with rain | Weather entry and window sealing remain relevant. | Have the window installation checked before treating it as a cooling fault. |
| Ice forms before the indoor drip | The water may be following a frost/thaw episode. | Use LG filter and frost guidance; request service if frost returns after supported checks. |
| Water approaches the cord or outlet | The location creates an electrical hazard. | Stop use; have the leak and electrical area made safe before another cooling test. |
Check a used LW8017ERSM before accepting it
Compare window support, side panels and cord condition with the LG installation instructions; do not move a heavy installed unit alone.
Parts boundary: Rain-only entry and cooling condensate are separate patterns; neither proves a refrigerant fault.
Quick start
What exactly is happening?
Choose the symptom closest to what you observe. We will show the matching diagnostic route first.
Model-specific parts guidance
Replaceable parts and how to confirm them
Window-air-conditioner diagnosis for the LW8017ERSM installation and airflow layout. Filter and installation checks are owner work; capacitor, refrigerant and live electrical work are excluded.
Washable air filter
low part-cost tierOEM identification: Owner-maintenance component; confirm replacement through the exact support page.
Location: Behind the front intake grille.
Suspect it when
- Airflow is weak
- Coil ices
- Cooling improves briefly after cleaning
Confirm before ordering
- Disconnect power
- Inspect for dust loading or damage
- Wash only as LG directs and dry completely
Repair route: Clean and reinstall; replace only if damaged or unable to seat.
Boundary: Never operate without the filter or reinstall it wet.
Verify afterward
- Confirm unrestricted airflow
- Run Cool mode with windows closed
- Check that ice does not return
Indoor fan / blower
moderate part-cost tierOEM identification: Confirm in the official parts diagram with the complete rating-plate suffix; do not order by the base model alone.
Location: Behind the indoor coil and front air path.
Suspect it when
- Air is cold at the coil but discharge is weak
- Fan noise, rubbing or failure to start occurs
Confirm before ordering
- Rule out filter and louver blockage
- Observe through the grille without inserting tools
- Have motor supply and free movement checked
Repair route: Arrange exact-model motor or blower diagnosis.
Boundary: Fan, capacitor and internal electrical access are service work.
Verify afterward
- Confirm stable fan speed
- Check for vibration or rubbing
- Verify room-temperature drop
Temperature sensor / control
moderate part-cost tierOEM identification: Confirm in the official parts diagram with the complete rating-plate suffix; do not order by the base model alone.
Location: In the indoor intake/coil area and control assembly.
Suspect it when
- Unit short-cycles
- Displayed temperature differs greatly from a separate thermometer
- Cooling command is inconsistent
Confirm before ordering
- Compare room temperature with a separate thermometer
- Remove direct heat/sun effects where possible
- Have sensor resistance and control response checked
Repair route: Replace only the tested sensor or control assembly.
Boundary: Do not move the sensor or open a powered control enclosure.
Verify afterward
- Confirm normal cycle length
- Compare displayed and measured temperature
- Check that protection trips do not recur
Condensate pan / drain path
moderate part-cost tierOEM identification: Confirm in the official parts diagram with the complete rating-plate suffix; do not order by the base model alone.
Location: At the cabinet base beneath the indoor and outdoor coils.
Suspect it when
- Water enters the room
- Water does not follow the installed cabinet path
- The pan is visibly damaged
Confirm before ordering
- Disconnect power and protect the outlet
- Check installation pitch against the exact guide
- Clear only owner-visible debris
Repair route: Correct installation or replace a confirmed damaged drain component.
Boundary: Do not drill an extra drain hole unless the exact installation instructions require it.
Verify afterward
- Run cooling under supervision
- Confirm water stays outside
- Check the plug and outlet remain dry
DIY, service, or replace?
Reasonable DIY
Filter care, mode/set point, louver clearance and exact-guide installation checks are owner work.
Arrange service
Use service for fans, sensors, capacitors, controls, compressor or refrigerant diagnosis.
Consider replacement
A room unit is often better replaced after a confirmed compressor/refrigerant repair or combined motor-and-control failure outside warranty.
Model-specific evidence
- LW8017ERSM product support
Exact model manuals, installation, warranty and service support.
- LW8017ERSM parts lookup
Full-suffix compatibility verification.
Tools for the supported checks
- Room thermometer
- Flashlight
- Soft brush
Confirm before acting
- Confirm the exact model label
- Check Cool mode and set point
- Inspect the washable filter and visible airflow path
- Compare cabinet pitch with the installation guide
Supported owner actions
- Wash and fully dry the filter before reinstalling
- Remove visible airflow obstructions
- Use the documented drain and installation configuration
- Ice returns after a complete thaw and clean filter
- Water reaches the plug or outlet
- Refrigerant odor or repeated protection-device trips
Verify after the check or repair
- Run cooling with windows closed
- Confirm normal condensate handling
- Measure room-temperature change over the documented period